
Automatically Update DNS to your Dynamic Home IP Address
And secure your SSH sessions too

In this tutorial, we're going to create a totally FREE DNS name that will point back to my dynamic home IP address. If you've ever wanted a way to call your home network without having to shell out the money for a static IP or have to remember to grab that home IP before you leave, this can help you.
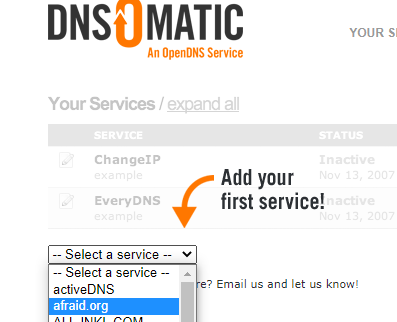
First, head over to DNSOMatic and create a free OpenDNS account (they are the same)
Once logged in, click Select a service and pick afraid.org
Leave this form open and in a new browser tab, go to freedns.afraid.org. Create a free account or login.
Confirm your email account. Once logged in, click on subdomains.
Add a new subdomain and create a type A record, give it a unique subdomain name and select one of the hilarious domains. I'm a fan of chickenkiller (I own a few chickens myself, so that makes it ok, right?).
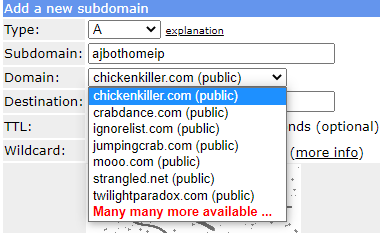
Make sure the Destination is set to your home IP. It should automatically fill this in.
Once created, select Dynamic DNS from the menu.
You'll see your 1 dynamic update candidate chickenkiller address.

Click on DirectUrl, which will open another browser tab to an update.php page with a guid at the end. That's the ID we need.

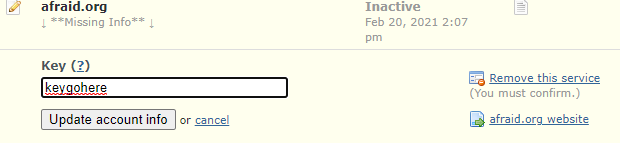
Take that ID and return to the DNS-O-Matic page from earlier.
On the DNS-O-Matic page with afraidorg selected, paste this value in the Key field.
Keeping it up to date
You can update the afraidorg DNS with a simple curl command
Windows:
curl -Method post https://freedns.afraid.org/dynamic/update.php?keygohere
Unix:
curl -X POST https://freedns.afraid.org/dynamic/update.php?keygohere
One useful way to use this:
Protected SSH with FirewallD
This script will pull your home Dynamic IP address and update your firewalld rules to allow SSH via that IP. It will also remove the old IP.
I personally can't stand the thought of having an open SSH port on the internet without some kind of bastion or proxy in-between, however sometimes you have to work with what you got, and I hope this helps you make it more secure.
Run the following commands to create a firewall zone
firewall-cmd --new-zone=sshonly --permanent
systemctl reload firewalld
firewall-cmd --zone=sshonly --add-service=ssh --permanent
firewall-cmd --zone=public --remove-service=ssh --permanent
Validate your firewalld at /etc/firewalld/zones/public.xml and /etc/firewalld/zones/sshonly.xml
Now create a new bash script, with proper permissions of course. Use the script below, updating it with the address you've setup for chickenkillercom
#!/bin/bash
oldip="$(cat /root/homeip)"
ip="$(getent hosts <chickenkiller.com address> | awk '{ print $1 }')"
echo $ip > /root/homeip
/bin/firewall-cmd --zone=sshonly --remove-source=$oldip --permanent
/bin/firewall-cmd --zone=sshonly --add-source=$ip --permanent
/bin/systemctl reload firewalld
Add this script as a cron job to run as often as you need.
This will updated your firewalld to allow SSH sessions only from the IP you've set to your afraidorg address.