


For those of you who have been working with cloud technologies and haven't concerned yourself with local VMs, good for you. However, there are still times that you need to test something quickly and locally, and having a local VM is sometimes the best way to do it.
That's why you should still use Vagrant, a tool that makes deploying local virtual machines incredibly simple.
Vagrant has been around for several years. It's owned by Hashicorp and ties into VirtualBox and other virtual machine providers.
Getting Setup for Vagrant
In case you've never used Vagrant, here's a quick primer. Install Vagrant on your Windows, Mac or Linux machine.
Download and install VirtualBox
Now head here and find a Vagrant box that meets your needs.
Deploy Your First Vagrant Box
I'll be using Oracle Linux 8.
Once you've chosen a Vagrant box, create a directory for your Vagrant virtual machine.
mkdir vagrant
cd vagrant
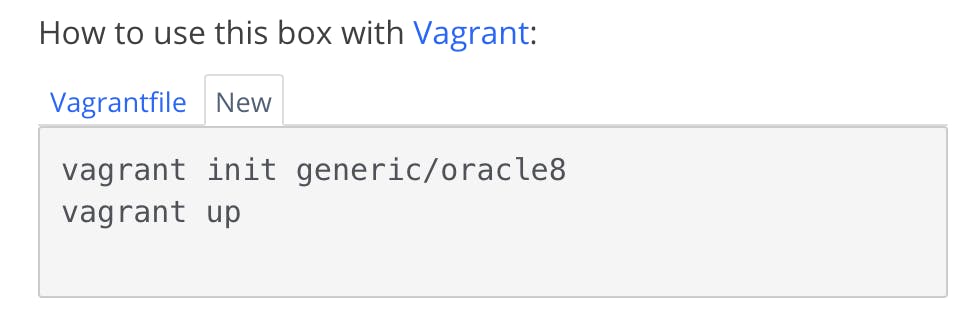
Click on the "New" tab on your Vagrant Box page, copy and run the commands listed:
That's all! You've successfully launched a Vagrant virtual machine! Connect to the machine with vagrant ssh, which will connect as a user called "vagrant" with sudo rights.
$ vagrant ssh
Last login: Tue Mar  9 01:41:36 2021 from 10.0.2.2
[vagrant@oracle8 ~]$
If you want to confirm it's no magic trick, you can open VirtualBox to see the headless VM running.
Here's a few common commands that you'll need:
vagrant init                  #initializes a new Vagrant environment by creating a Vagrantfile
vagrant up                   #launches a virtual machine
vagrant package         #packages a running vagrant environment into a box
vagrant halt                 #stops a running virtual machine
vagrant reload             #restarts vagrant machine, loads new Vagrantfile configuration
vagrant resume           #resume a suspended vagrant machine
vagrant ssh                  #connects to your vagrant machine as the vagrant user
vagrant destroy           #shuts down and deletes a virtual machine
vagrant powershell      #connects to machine via powershell remoting
vagrant push                #deploys code in this environment to a configured destination
vagrant provision         #provisions the vagrant machine
The Vagrant File
When you initialize your Vagrant folder, a Vagrantfile is created. This file defines all of the tweaks you can make to your VM at launch, including SSH ports, memory, cpu, network config, and start-up scripts with provisioners such as Ansible. You can also tie a local development folder that will deploy to the server at startup.
Here's a simple example. Change the Vagrantfile to include the following to install Apache.
  config.vm.provision "shell", inline: <<-SHELL
    sudo dnf -y install httpd
    sudo systemctl start httpd
    sudo systemctl enable httpd
    sudo firewall-cmd --permanent --zone=public --add-service=http
  SHELL
Save the file and run. This will install httpd, start the httpd service, set it to autostart on reboot and update the firewall to allow access for http.
vagrant provision
This will rerun the provisioner and kick off the apache installation.
You can also port forward from the Vagrantfile.
Add this to your Vagrantfile.
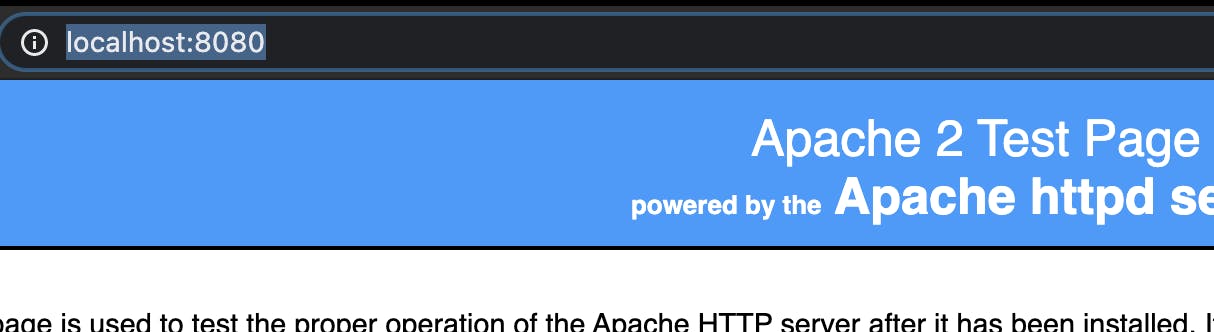
config.vm.network "forwarded_port", guest: 80, host: 8080
Now with a change to the vm network, we have to run vagrant reload to force this change to the network settings, which will reboot the VM.
vagrant reload
This should allow you to access the default Apache page via localhost:8080
A fun test is to completely destroy the machine and rerun a deploy.
vagrant destroy
vagrant up
It's much faster than the first run because it still has the image we're using cached, so it doesn't need to redownload it.
This is just scratching the surface. You can create your own Vagrant boxes and how them on Vagrant Cloud.
You can also tie to a number of other providers, including VMWare, HyperV, Docker, or a custom provider.
-AJ